随着XTLS特征被逐渐识别,Xray 1.8.0+也已推出了最新的Reality协议,根据介绍,可消除服务端 TLS 指纹特征,仍有前向保密性等,且证书链攻击无效,安全性超越常规 TLS。可以指向别人的网站,无需自己买域名、配置 TLS 服务端,更方便,实现向中间人呈现指定 SNI 的全程真实 TLS。
传送门:https://github.com/XTLS/REALITY
Xray搭建
新服务器先安装开发工具
yum groupinstall "Development Tools"
- 下载安装官方代码
bash -c "$(curl -L https://github.com/XTLS/Xray-install/raw/main/install-release.sh)" @ install检查版本是否1.8.0及以上
xray version - 生成reality所需的密钥对并查看,保存路径可自行替换
xray x25519 > /home/key cat /home/key - 编辑xray配置文件
vim /usr/local/etc/xray/config.json使用以下配置,SNI为亚马逊网址
{ "log": { "loglevel": "warning" }, "routing": {//禁用回国流量,避免客户端不小心使用全局路由风险 "domainStrategy": "IPIfNonMatch", "rules": [ { "type": "field", "ip": [ "geoip:cn", "geoip:private" ], "outboundTag": "block" } ] }, "inbounds": [ { "listen": "0.0.0.0", "port": 443, "protocol": "vless", "settings": { "clients": [ { "id": "aliang", // 长度为 1-30 字节的任意字符串,或执行 xray uuid 生成 "flow": "xtls-rprx-vision" } ], "decryption": "none" }, "streamSettings": { "network": "tcp", "security": "reality", "realitySettings": { "dest": "www.amazon.com:443", // 目标网站最低标准:国外网站,支持 TLSv1.3、X25519 与 H2,域名非跳转用(主域名可能被用于跳转到 www) "serverNames": [ // 必填,客户端可用的 serverName 列表,暂不支持 * 通配符,和dest相配 "amazon.com", "www.amazon.com" ], "privateKey": "2KZ4uouMKgI8nR-LDJNP1_MHisCJOmKGj9jUjZLncVU", // 上一步 xray x25519 生成,填 "Private key" 的值 "shortIds": [ // 客户端可用的 shortId 列表,可用于区分不同的客户端 "88" // 0 到 f,长度为 2 的倍数,长度上限为 16,可留空,或执行 openssl rand -hex 8 生成 ] } } } ], "outbounds": [ { "protocol": "freedom", "tag": "direct" }, { "protocol": "blackhole", "tag": "block" } ] } - 重启xray服务
systemctl restart xray
#查看启动日志
journalctl -xe --no-pager -u xray
到这一步启动日志正常的话已经可以连接使用了,客户端配置如下

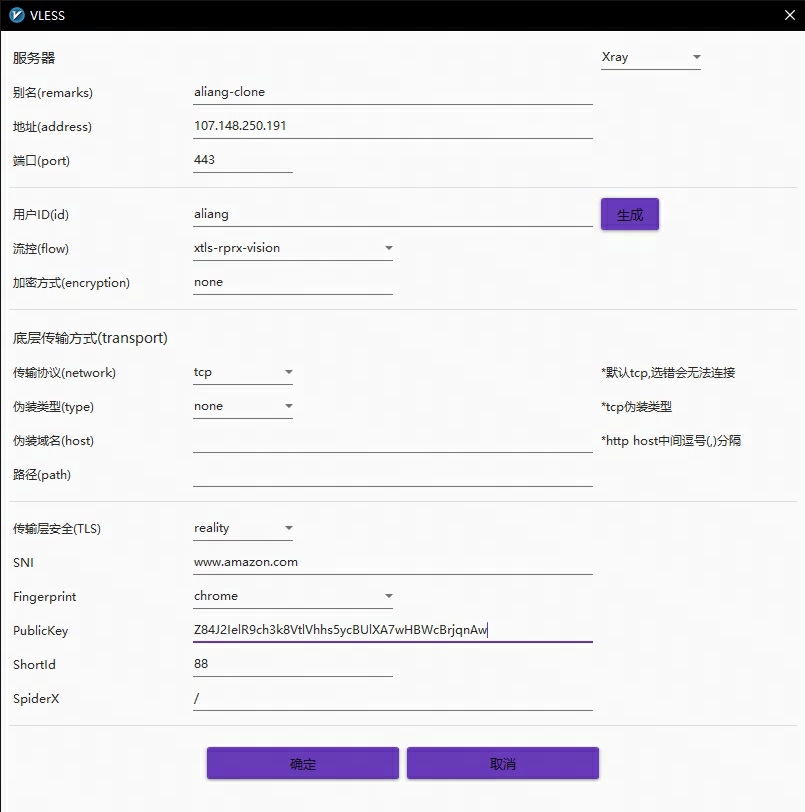
SNI指向自己的网站
上述xray配置我们使用了443端口,且伪装SNI使用第三方网站域名,这也是REALITY 协议的优势,我们无需再额外搭建一个真实的自有网站来伪装流量(XTLS协议),不过如果已经有自己的网站了,当然还是用自己的更好,理论上第三方域名解析与我们的服务器IP偏差太大还是有被识别的风险。
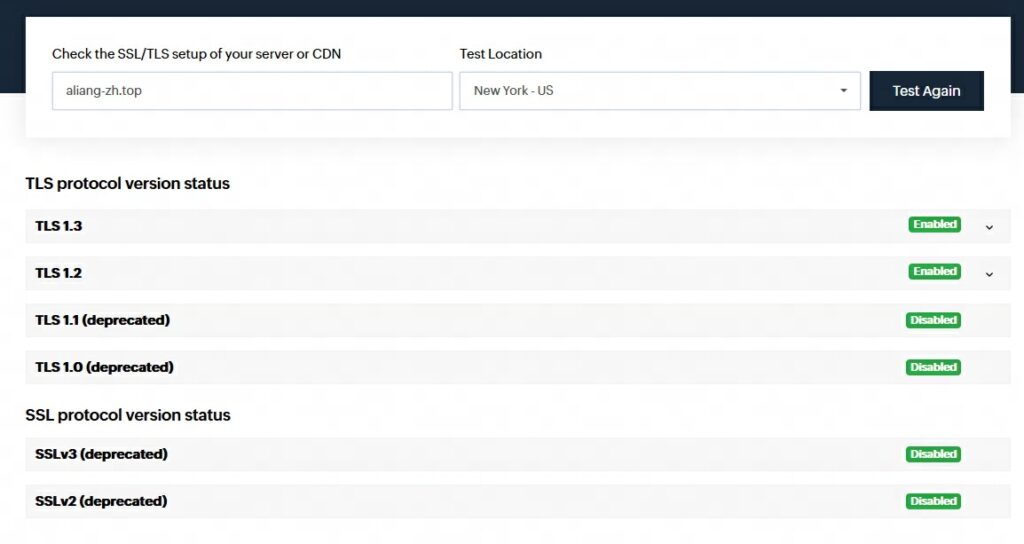
要指向自己的网站要求也是一样,网站需要支持TLSv1.3和http2,检测地址比如:https://www.site24x7.com/tools/tls-checker.html
openssl升级
支持TSLv1.3需要openssl 1.1.1及以上,可以查看自己的openssl是否支持TSLv1.3
openssl ciphers -v | awk '{print $2}' | sort | uniq不支持则重新编译安装
- 下载解压openssl-1.1.1
wget https://ftp.openssl.org/source/openssl-1.1.1k.tar.gz tar -xzvf openssl-1.1.1k.tar.gz && cd openssl-1.1.1k - 编译并安装
./config --prefix=/usr --openssldir=/usr/local/ssl --libdir=lib no-shared zlib-dynamic make make install - 设置环境变量
vim /etc/profile.d/openssl.sh输入
export LD_LIBRARY_PATH=/usr/local/lib:/usr/local/lib64生效
source /etc/profile.d/openssl.sh - 确认版本已升级
openssl version
Nginx支持TSLv1.3
一般通过yum直接安装的nginx由于使用低版本的openssl因此不支持TSLv1.3,所以也需要使用openssl-1.1.1重新编译安装
-
下载解压官方1.16.1版本源码
wget http://nginx.org/download/nginx-1.16.1.tar.gz tar xvf nginx-1.16.1.tar.gz && cd nginx-1.16.1 -
配置安装模块
建议先查看当前已安装的nginx配置,在后面增加指定openssl库即可(–with-openssl=/home/openssl-1.1.1k),避免新旧目录不一致导致启动失败:
nginx -V./configure --prefix=/etc/nginx --sbin-path=/usr/sbin/nginx --modules-path=/usr/lib64/nginx/modules --conf-path=/etc/nginx/nginx.conf --error-log-path=/var/log/nginx/error.log --http-log-path=/var/log/nginx/access.log --pid-path=/var/run/nginx.pid --lock-path=/var/run/nginx.lock --http-client-body-temp-path=/var/cache/nginx/client_temp --http-proxy-temp-path=/var/cache/nginx/proxy_temp --http-fastcgi-temp-path=/var/cache/nginx/fastcgi_temp --http-uwsgi-temp-path=/var/cache/nginx/uwsgi_temp --http-scgi-temp-path=/var/cache/nginx/scgi_temp --user=nginx --group=nginx --with-compat --with-file-aio --with-threads --with-http_addition_module --with-http_xslt_module=dynamic --with-http_image_filter_module=dynamic --with-http_auth_request_module --with-http_dav_module --with-http_flv_module --with-http_gunzip_module --with-http_gzip_static_module --with-http_mp4_module --with-http_random_index_module --with-http_realip_module --with-http_secure_link_module --with-http_degradation_module --with-http_slice_module --with-http_ssl_module --with-http_stub_status_module --with-http_perl_module=dynamic --with-http_sub_module --with-http_v2_module --with-mail --with-mail_ssl_module --with-stream --with-stream_realip_module --with-stream_ssl_module --with-stream_ssl_preread_module --with-openssl=/home/openssl-1.1.1k --with-cc-opt='-O2 -g -pipe -Wall -Wp,-D_FORTIFY_SOURCE=2 -fexceptions -fstack-protector-strong --param=ssp-buffer-size=4 -grecord-gcc-switches -m64 -mtune=generic -fPIC' --with-ld-opt='-Wl,-z,relro -Wl,-z,now -pie' -
编译并安装
make make install #检查版本 nginx -V -
编辑配置
vim /etc/nginx/nginx.conf先按如下配置测试TSLv1.3:
http { include /etc/nginx/mime.types; default_type application/octet-stream; log_format main '$remote_addr - $remote_user [$time_local] "$request" ' '$status $body_bytes_sent "$http_referer" ' '"$http_user_agent" "$http_x_forwarded_for" $request_time'; access_log /var/log/nginx/access.log main; server_tokens off;#禁用响应版本号 sendfile on; keepalive_timeout 65; #gzip on; #上传文件最大大小 client_max_body_size 256m; include /etc/nginx/conf.d/*.conf; server { server_name your.domain;#填写你的网站域名 listen 443 ssl http2; ssl_certificate /etc/fullchain.pem; #你的SSL证书文件 ssl_certificate_key /etc/privkey.pem; #你的SSL证书私钥文件 # 必选:设置 SSL 协议和加密算法 ssl_protocols TLSv1.2 TLSv1.3; ssl_ciphers "ECDHE-ECDSA-AES128-GCM-SHA256:ECDHE-RSA-AES128-GCM-SHA256:ECDHE-ECDSA-AES256-GCM-SHA384:ECDHE-RSA-AES256-GCM-SHA384:ECDHE-ECDSA-CHACHA20-POLY1305:ECDHE-RSA-CHACHA20-POLY1305:DHE-RSA-AES128-GCM-SHA256:DHE-RSA-AES256-GCM-SHA384"; # 可选:设置 SSL 会话缓存 ssl_session_cache shared:SSL:10m; ssl_session_timeout 10m; # 可选:开启 OCSP Stapling,提高 SSL 握手性能 ssl_stapling on; ssl_stapling_verify on; location / { #你的网站转发配置 } } } -
检测配置文件并重启nginx测试
#如果之前的xray占用了443端口,我们需要先关闭xray服务 systemctl stop xray nginx -t systemctl restart nginx -
确保此时在浏览器通过htpps://your.domain能正常访问你的网站,否则请检查你的证书和转发配置,然后在线检测TSLv1.3是否成功开启
Xray配置SNI回落指向Nginx
通过上面步骤我们已确保自己的网站可用于REALITY协议代理,现在我们打通Xray与Nginx,让所有出墙的流量伪装成对自己网站的访问流量,同时自己的网站也可正常访问!
-
修改Nginx监听配置,开启proxy_protocol协议
server { #server_name your.domain;#关闭域名区分 listen 127.0.0.1:1443 ssl http2 proxy_protocol;#修改端口,监听本地流量,开启proxy_protocol协议用于网站获取真实访问IP,否则都是本机 set_real_ip_from 127.0.0.1;#真实IP获取设置 real_ip_header proxy_protocol;#真实IP获取设置 ssl_certificate /etc/fullchain.pem; #你的SSL证书文件 ssl_certificate_key /etc/privkey.pem; #你的SSL证书私钥文件 # 必选:设置 SSL 协议和加密算法 ssl_protocols TLSv1.2 TLSv1.3; ssl_ciphers "ECDHE-ECDSA-AES128-GCM-SHA256:ECDHE-RSA-AES128-GCM-SHA256:ECDHE-ECDSA-AES256-GCM-SHA384:ECDHE-RSA-AES256-GCM-SHA384:ECDHE-ECDSA-CHACHA20-POLY1305:ECDHE-RSA-CHACHA20-POLY1305:DHE-RSA-AES128-GCM-SHA256:DHE-RSA-AES256-GCM-SHA384"; # 可选:设置 SSL 会话缓存 ssl_session_cache shared:SSL:10m; ssl_session_timeout 10m; # 可选:开启 OCSP Stapling,提高 SSL 握手性能 ssl_stapling on; ssl_stapling_verify on; location / { #你的网站转发配置 } } - 修改Xray配置,SNI指向Nginx并开启分流
{ "log": { "loglevel": "warning" }, "routing": { "domainStrategy": "IPIfNonMatch", "rules": [ { "type": "field", "ip": [ "geoip:cn", "geoip:private" ], "outboundTag": "block" } ] }, "inbounds": [ { "listen": "0.0.0.0", "port": 443, "protocol": "vless", "settings": { "clients": [ { "id": "aliang", "flow": "xtls-rprx-vision" } ], "decryption": "none" }, "streamSettings": { "network": "tcp", "security": "reality", "realitySettings": { "dest": "1443", //本机Nginx的监听端口 "serverNames": [ //自己网站证书匹配的域名 "your.domain" ], "privateKey": "2KZ4uouMKgI8nR-LDJNP1_MHisCJOmKGj9jUjZLncVU", "shortIds": [ "88" ] } }, "sniffing": {//开启流量嗅探,用于将本网站访问流量转发给Nginx "enabled": true, "destOverride": [ "http", "tls", "quic" ] } } ], "outbounds": [ { "protocol": "freedom", "tag": "direct" }, { "protocol": "blackhole", "tag": "block" } ] } - 分别重启Nginx和Xray,将客户端配置的SNI改为自己的域名(serverNames中的一个)
大功告成!!!
附录
各客户端传送门
- win:https://github.com/2dust/v2rayN
- android:https://github.com/2dust/v2rayNG
- mac:注册美区帐号应用商店下载shadowrocket
使用certbot创建并管理SSL证书
yum install certbot
#先确保nginx正常监听80端口,然后使用交互式生成
cerbot run
#验证方式选dns,随后在DNS提供商处新增添加名称为'_acme-challenge'的TXT记录
#域名选择处直接回车匹配所有域名,随后按照提示一步步生成,certbot会自动修改nginx配置
#查看已申请的证书
certbot certificates
#添加定时任务自动续期
crontab -e
0 1 */3 * * /usr/bin/certbot renew > /var/log/certbot.log 2>&1